 @tresjs/nuxt
@tresjs/nuxt
TresJSを使用してNuxtアプリケーションで3Dエクスペリエンスを作成します。

@tresjs/nuxt


TresJSの公式Nuxtモジュールです。Vueコンポーネントのように3Dシーンを構築します。
機能
- 🤓 TresJSエコシステム からコンポーネントとコンポーザブルを自動インポート
TresCanvasはクライアント専用です。コンポーネント名に.clientを追加したり、<ClientOnly />を使用する必要はありません。- TresJSコンポーネントをサポートするようにVueコンパイラを自動的に設定します。 理由 をご覧ください。
- NuxtがもたらすすべてのDXマジック ✨
- 新機能 v2: TresJS nuxt開発ツール。
クイックセットアップ
@tresjs/nuxt依存関係をプロジェクトに追加します
npx nuxi@latest module add tresjs
nuxt.config.tsのmodulesセクションに@tresjs/nuxtを追加します
export default defineNuxtConfig({
  modules: ['@tresjs/nuxt'],
})
これで完了です! Nuxtアプリで @tresjs/nuxt を使用できるようになりました ✨
TresJSエコシステムの任意のパッケージを使用する場合は、使用するパッケージをインストールすると、モジュールによって自動的にインポートされます 🧙🏼♂️.
# Using pnpm
pnpm add @tresjs/cientos @tresjs/post-processing
開発ツール
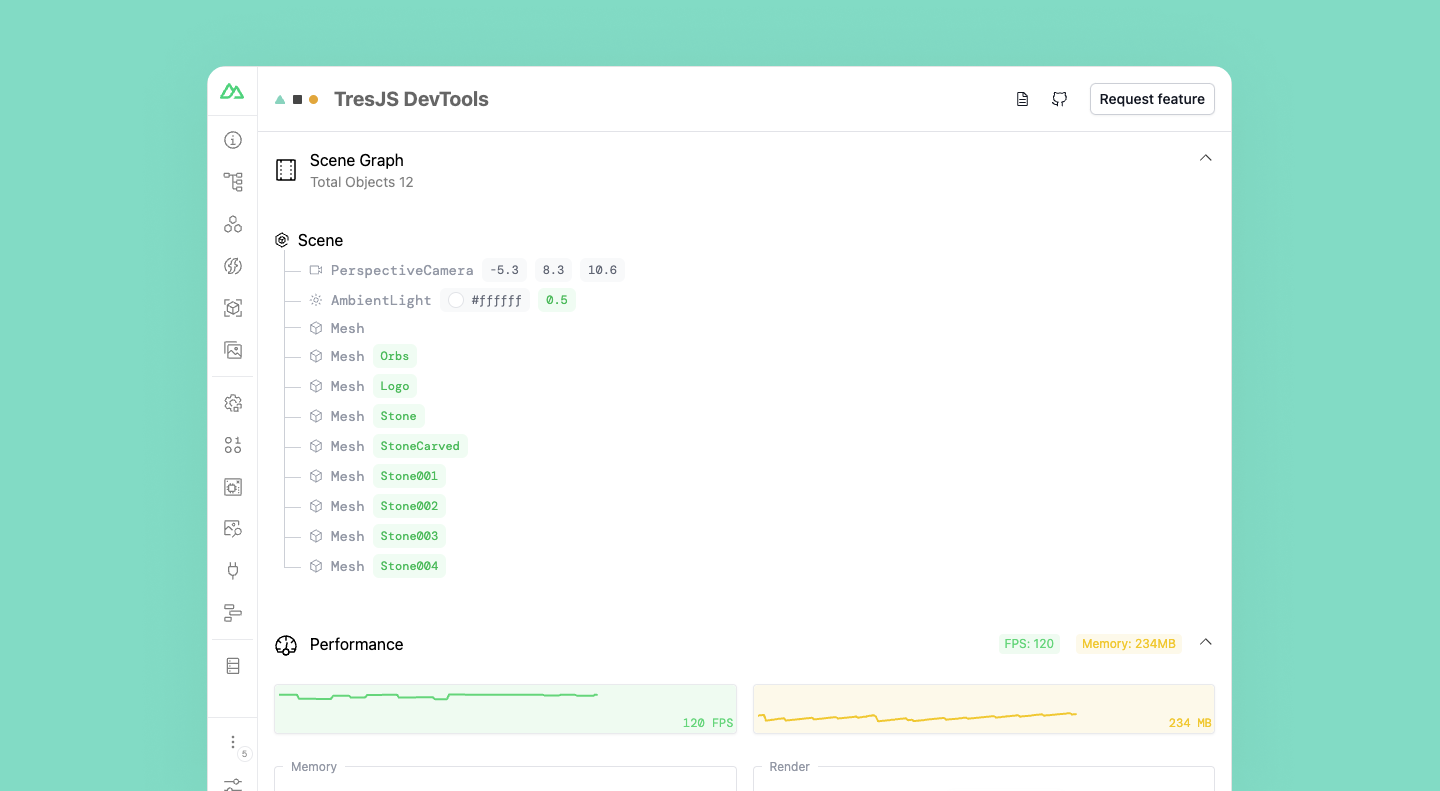
TresJS nuxtモジュールには、3Dシーンを検査し、パフォーマンスを測定できる開発ツール拡張機能が付属しています。
開発ツールをアクティブにするには、nuxt.config.ts の tres セクションに devtools オプションを追加する必要があります。
export default defineNuxtConfig({
  modules: ['@tresjs/nuxt', '@nuxt/devtools'],
  tres: {
    devtools: true,
  },
})
GLSLシェーダーのサポート
TresJS nuxtモジュールには、GLSLシェーダーを文字列としてインポートできるviteプラグインが付属しています。内部的には vite-plugin-glsl を使用しています。
export default defineNuxtConfig({
  modules: ['@tresjs/nuxt', '@nuxt/devtools'],
  tres: {
    glsl: true,
  },
})
このオプションを有効にすると、コンポーネントでGLSLシェーダーを文字列としてインポートできます。
<script setup lang="ts">
import fragmentShader from './shaders/fragment.glsl'
import vertexShader from './shaders/vertex.glsl'

const uniforms = {
  uTime: { value: 0 },
  uAmplitude: { value: new Vector2(0.1, 0.1) },
  uFrequency: { value: new Vector2(20, 5) },
}
</script>

<template>
  <TresMesh
    :position="[0, 4, 0]"
  >
    <TresSphereGeometry :args="[2, 32, 32]" />
    <TresShaderMaterial
      :vertex-shader="vertexShader"
      :fragment-shader="fragmentShader"
      :uniforms="uniforms"
    />
  </TresMesh>
</template>
開発
# Install dependencies
npm install

# Generate type stubs
npm run dev:prepare

# Develop with the playground
npm run dev

# Build the playground
npm run dev:build

# Run ESLint
npm run lint

# Run Vitest
npm run test
npm run test:watch

# Release new version
npm run release